Wednesday, June 5, 2013

Tianna Cupcakes: a Tutorial and Free Printable

My niece turned 7 this last month and requested a Tiana, or Princess and the Frog birthday.  I wanted to do something different than this cake that I've done:


So I started perusing, and came across this bad boy on Cake Central by KO_sbaker!


YES!!  Then, sadly, I had to check myself before I wrecked myself, and remind myself that she's SEVEN and save this one for her 16th birthday.  So, I went with these instead:


They were super easy.  You can make them too!  See the cute invite in the back?  My sister bought it from T3designs.com and I used it so everything would match.  It's illegal for me to let you do that too, since you didn't buy it.  Don't be sad!  I made this one for you!  Just click to download my free printable!  https://www.dropbox.com/sh/k6d6agz2fu2cmvj/fwb27sDkAi/tiana%20cupcake%20toppers.pdf

I'd love to make you an invitation too!  Just e-mail me at chelsi.johnston@gmail.com

Okay, so, after you print those out on white cardstock, cut them out while you watch The Princess and the Frog.  After that's done, bake some cupcakes in pretty liners.  I got my flower liners at Micheal's.  After I baked them I got the idea to plop a Hershey's kiss in the middle of each cupcake before baking.  You know, because she had to kiss the frog?  Anyway...

Let's talk icing.  A good ratio is 2 cups shortening or butter for every pound of powdered sugar you use.  If you use shortening, your frosting will have a truer color and it will be fluffier.  However, it will be a little greasier than butter.  A pinch of salt can help cut the greasy factor.  Butter is great too and tastes like a true buttercream, but it will color your frosting yellow.  And lets face it, sometimes you don't have 4 sticks on hand!  I typically use half shortening and half butter in my frosting, unless I'm worried about color. Let's get to the good stuff.

Basic Vanilla Buttercream:
yield about 4 cups, enough for 24 cupcakes
2 cups (4 sticks) butter or shortening, or both
1 tsp vanilla (Use clear vanilla to avoid coloring your frosting yellow.)
pinch of salt
1 lb (about 3 and 3/4 c) confectioner's (powdered) sugar, sifted

  1. Cream butter/shortening, vanilla and salt in a mixer till fluffy and smooth
  2. Place a towel around your bowl to avoid a sugary cloud
  3. At your mixer's lowest speed, add powdered sugar 1/4 c at a time, turning up the speed as needed.  
Voila!  East peasy, right?  Now, about adding color.  If you can, use gel colors instead of liquid.  Gel colors have less of a thinning effect on your icing.  They are available in the baking section of grocery stores and hobby stores.  Betty Crocker is even making them now so they are easily available!  Add your color a little bit at a time using a toothpick.  Remember, you can always add but you can't take it back!  Dye all of your icing yellow for now.

Now, lets fill our bags.  If you are looking for icing tips, I used a large standard leaf tip, #366 for the yellow petals, and a small standard leaf tip, #352 for the leaves on her skirt.  If you don't own icing tips, you can cut the corner of a ziplock bag into a V, just like this tip:
Cut small, you can add later if you need to.  Also, if you're using this method, reinforce the sides of your bag with tape.  

Decorating Tiana Cupcake:
  1. Fill your bag with yellow icing; we're using the large tip first.  I find it makes it easier to put my bag into a tall glass and fold the edges over; like this:
  2. Now grab a cupcake.  Hold your tip in the middle of the cupcake with the tip turned like a beak, so the points are vertical from your point of view.  
  3. Squeeze the bag and build up the base of the leaf.  Pull out from the center, decreasing pressure as you go.  Drag out to the edge of the cupcake and release all pressure, forming a point.  Don't worry.  If it's ugly, just scrape it off and put it back in your bowl.  Form six petals that meet in the middle on each cupcake.
  4. Stick Tiana in the middle
  5. Squeeze remaining icing into your mixing bowl and add blue to create green.  
  6. Switch to the smaller tip, or cut a smaller V in a ziplock bag and fill.
  7. Use the same method to make smaller, shorter leaves on top of the yellow petals and around the base of Tiana.
  8. I used fondant and this tiny cutter tool to create the lily at the base of her skirt.  You could easily use cookie cutters if you had them, or cut them by hand.  A flower-shaped sprinkle would be cute too!
  9. Finally, I sprinkled gold-colored sugar over it to make it sparkle!
I hope you can use this tutorial to make your own Tiana cupcakes!  Don't forget to comment and leave me a picture!

First Flight Baby Shower


Yesterday, I told my friend that since I got laid off, I've been busier than ever, but I couldn't really pinpoint what I'd been doing.  I'd pictured using this time to read leisurely in my hammock, update my scrapbook, paint a few paintings, and bake...oooohhh there it is...baking.  I've been baking.  And planning parties!  The first one was a baby shower for a best friend of mine.  She just had her first baby and I was more than excited to throw her a shower.  She's a pilot, so I wanted the shower to be airplane-themed.  I may or may not have been planning this thing for about ten months.  (It was a post-labor shower.)  Here are a few pics of how it turned out!


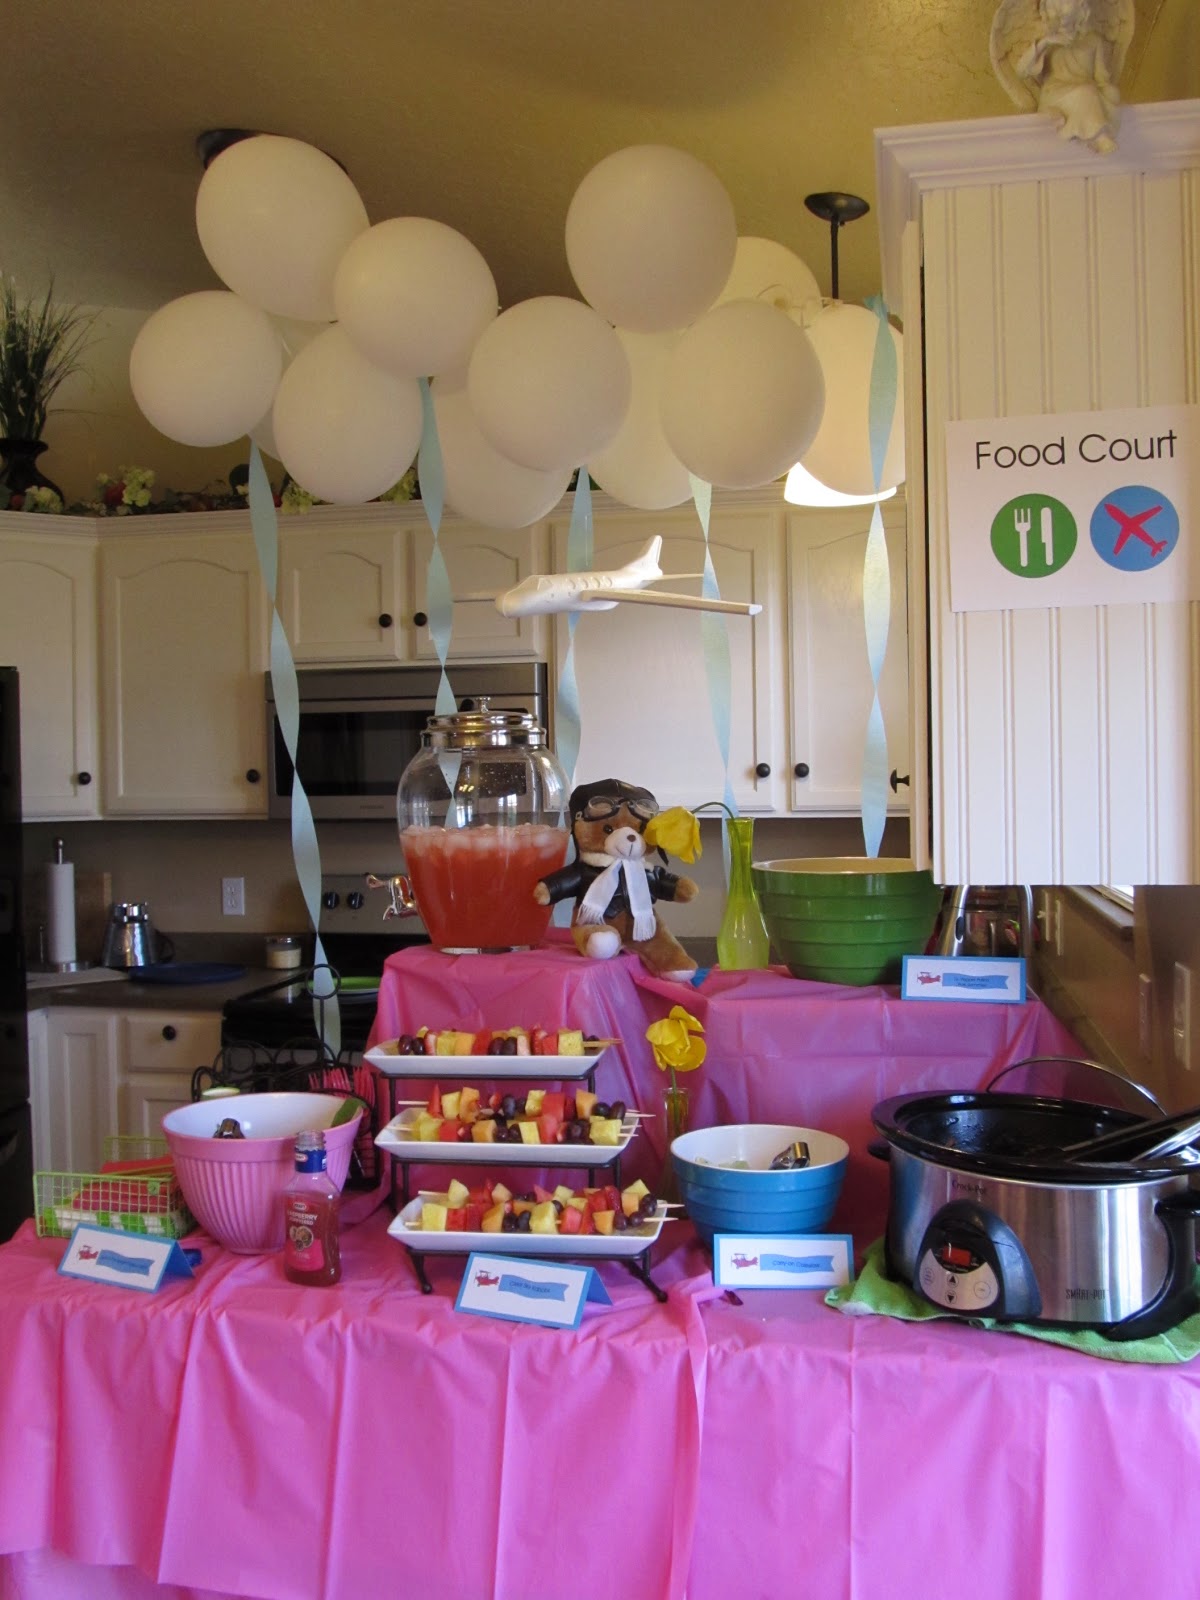
I made a tiny sky above the food table using balloons, crepe paper and one of many styrofoam planes I bought from the dollar store.  I just strung fishing line from my cabinet to my wall, then hung crepe paper and tied balloons to the line for clouds.  Don't forget your Food Court signage!


Downstairs I hung about six tablecloths cut in half outward from my light fixture in the middle of the room using thumb tacks!  Afterward I made tons of little cloud balls and hung them sporadically, as well as planes, throughout the room and added a few balloons to cover the edges of the tablecloths.


My brother had a few pilotish things since he has his private pilot's license. And a mutual friend of D's and I is also a pilot, so she brought like everything she owned for me to use.  Thanks, Cass!  One of the suitcases is from my local thrift store, and one is my great grandmother's!  How fun is that?


I made some "Wishes for Baby" sheets for the guests to fill out.  This was one of my favorite parts of the shower!

Deneal, the guest of honor, is obsessed with Dr. Pepper, so for dinner we had Dr. Pepper pulled pork sammies.  We also had "Carry-on Coleslaw," "Rainbow Fruit Kabobs," "Seats in the Upright Position Salad" and dessert...

Don't forget treat bags so your guests can take some treats home "for their kids." ;)


Turbulence Taffy.  It's skewered so that people can take a taffy stick!  People thought I'd stacked it in the vases!


Mallow Propellers.  First I made the propellers using white chocolate in a squeeze bottle and squirting it onto parchment paper.  Waxed paper works too.  Then just skewer a mallow, dip it in blue candy melts and let dry.  After they set up, fill another squeeze bottle with blue and use a small mount to attach propellers.  Hold each one in place till it's set up.  Use the same process to attach a green M&M!


Cloudy Cake Pops.  I used a squeeze bottle filled with white chocolate that had set up and thickened a bit to make the clouds.  It took a little trial and error to get the right consistency.


And Dr. Pepper Precious Cargo Cupcakes.  These were sooo good!!  I really liked the consistency.  Recipe from BS in the Kitchen here.


I modified these Valentines from Just Something I Made and used them as invitations.  They turned out adorably.  As a favor, I gave little bags of peanuts.  Just like you get on an airplane, except immensely cuter!  We also gave mini hand sanitizers that said, "Thank you for coming and touching Deneal's life, now you can touch her baby."  Those were a hit, but I failed to get a picture.


As a party game, I froze these creepy plastic babies in icecube trays.  Each guest got one icecube and whoever's baby melted first had to yell, "My water broke!" for a prize.  I usually hate games, but I thought the idea was great! 

I felt like the shower was pretty epic and so did everyone else.  The only fail was that I was so busy being host I neglected to get a picture of me and Deneal!  Sigh.  

Throw your own First Flight baby shower.  See my inspiration board here on Pinterest!  For graphic design requests, just e-mail me at chelsi.johnston@gmail.com.  I'd love to help!

Friday, April 12, 2013

Oscar Cake


You know what cheers up grouchy people?  Cake.  My nephew was having a Sesame Street birthday party for his second birthday and I'll admit, I kinda lamented.  About two years ago I tried these Sesame Street cake pops from Bakerella.  They were a disaster.  They did not meet my expectations and they took like a bajillion years to make.  UUUUUGH...I get grouchy just thinking about it.  So those were a definite no.  Elmo is adorable, but let's face it, he's played.  My favorite character is Cookie Monster, duh, but I couldn't really think of a way to translate him into cake (not yet anyway).  So, when the hubs suggested Oscar, I went for it.  Garbage can=cake shaped=score!  So, I was searching for Oscar images and ran across this tutorial on YouTube.  He suggested using muffin tops for Oscar's head. Brill.  So, that's what I did.

I used five layers of a six-inch chocolate cake for the garbage can.  I was going to use six, but as I stacked them, it started to look too cylindrical.  I stacked three layers, doweled them, and then put the other two layers on a six-inch cake board before stacking them too.  The cake board made a slight rim in the fondant when it was covered, but it looked like the rim of the garbage can; a happy accident.  After covering the cake with A LOT of frosting, I used Duncan Hines Frosting Creations again, cotton candy, kids (and me...) LOVE that stuff, I covered it in white fondant; Duff Goldman's, of course.  It was difficult to cover because it was so tall and we needed a bigger skirt than we were able to get with the amount of fondant we had.  Next time I might consider buttercream in lieu of fondant.

After it was covered, I made details like imprints down the sides using my fondant tools.   I also added a rim using fondant on the bottom and top of the can.  Finally, I made handles (with screws in them; not real ones, duh) and set them out to dry overnight.

For the lid, I baked a giant cookie in my six-inch pan using about half a roll of Nestle chocolate chip cookie dough and ate about a fourth of the rest.  ;)  After letting it harden up a bit, I frosted it and covered it in fondant and added details like imprints and a handle on top. I also made Oscar's eyes and tongue out of fondant the night before so they would harden up a bit too, as well as the number 2 and Slimy!  Slimy is striped, so I rolled out two ropes, one of orange and one of yellow, and cut each into sections.  Then I made a worm using every other color, smushed it together and rolled it a little between my hands to smooth it out.  Thanks Playdough for teaching me these skills in my youth!  If any of you are scared of fondant- it really is like Playdough, but tastes good (if you use Duff Goldman's-- trust me!). I used my Americolor Gourmet Writers to add Slimey's face as well as Oscar's pupils.  Americolor Gourmet Writers are simply markers that have edible ink!  I had just black, red and green ones, but the hubs got me a whole set for Christmas!  Squeal!

Next, I sprayed the entire thing using Wilton Color Mist in black first, a light layer, then in a much heavier layer of silver.  I was really happy with the results.  I frequently get asked if I have an airbrush machine.  Wilton Color Mist is rad.  I don't think I would buy one if I got the chance because I get such good results with the mist!  I would totes buy a Cricut Cake though.  But I digress.  I had to use two whole cans of each color for the garbage can and a whole can of each for the lid and handles.  I actually ran out before the lid and handles and my mom was nice enough to go to the store for me when she came to visit.  I only had four hours to finish the cake and hadn't started Oscar yet.

Then, I dyed the frosting green using about half of a bottle of Wilton Gel Color in green and about a fourth of a bottle in brown to get his grimy color.  I cut two tops off of jumbo chocolate muffins and used the two bottoms for the neck, shoving another dowel through the whole thing.  I frosted the neck and used my spatula, lifting it off of the surface, to create little peaks for the fur.  Then I added the bottom half of his jaw and frosted it using the same technique.  Before I added the top of his head I rolled out a circle of black fondant for the inside of his mouth and pressed it to the bottom half of the jaw till the pressure formed a lip around it.  Then I added his tongue and painted some hilights on it.  I did the same thing with a black fondant circle for the top half of his head after frosting it underneath.  I added the top half of the head, securing it with yet another dowel.  I frosted him and added his eyes with toothpicks, then added his eyebrows and hands using a star tip, then making it messier with my spatula.   Finally, I added Slimey and the handles to the garbage can, securing them with toothpicks.  I waited till we were at the party to lean the lid up in front of the garbage can.  (Ps.  Traveling with him was a little nerve-wracking, despite all of the dowels.  Why do I keep making these tall cakes?!)

I was very happy with the result and so was my nephew!

Tuesday, March 5, 2013

Princess Castle 2.0

Okay, so my girl Liv was turning 5 and having a huuge party.  Like epic.  Like bouncy house epic.  So, in lieu of this standard princess castle cake:


 I decided to kick it up a notch!  Here is the final product:


It was huge!  She loved it! I want to talk about a few things concerning this cake. Let's talk frosting!  This is a fondant covered cake.  I know, I can hear a collective groan.  Stop groaning.  This is a fondant  created by Duff Goldman of Charm City Cakes.  And it is awesome.  It tastes really, really good and it has a soft texture like a marshmallow.  Like MARSHMALLOW fondant.  It tastes like buttercream frosting.  Trust me!  Just try it.  And it is so much easier to use!  It stretches, it's pliable, it's not sticky, and it covers cakes so much easier.  SO much easier than the stuff that I won't mention by name.  I usually by Duff's at Micheal's with a 40% off coupon. I recently saw the fondant at Walmart, but with the coupon it's actually cheaper at Micheal's.  But how convenient to be at Walmart!

I also textured the fondant using another one of Duff's products.  He has these cool texture tiles you can use on your fondant.  I have a stone set, which comes with two sizes of stone, and a wood set, which also comes with two sizes.


Here's an example where I used my wooden set on a Smurf House cake I made:


Now, let's talk about what's underneath the fondant.   Okay, so, this may be the most exciting thing that has happened to me in a long time.  I was perusing the cake aisle at the grocery store and found icing mix ins called Flavor Creations from Duncan Hines.  At first I was like, "Oh, cool."  That was before I saw the flavors. Flavors like:
  • Caramel
  • Key Lime Pie
  • Lemon
  • Lemonade
  • Fruit Punch
  • Bubble Gum
  • Cherry Vanilla
  • Chocolate Almond
  • Chocolate Marshmallow
  • Cinnamon Roll
  • Cotton Candy
  • Chocolate Mint
  • Mocha
  • Orange Cream
  • Strawberry Shortcake
  • White Chocolate Raspberry
  • Peaches n’ Cream
Of course, I had to try one of them.  I knew Liv and her friends would love either bubble gum or cotton candy.  I opted for cotton candy and just added it to my icing recipe.  It turned the most beautiful shade of blue and it. was. so. GOOD!  I wanted to take out a cup and just eat the frosting.  I cannot wait to try the rest of them!  I saw that during the holidays they have flavors like eggnog and gingerbread too!  Oh, yes!  

Ps.  Bouncy houses can hold up to like 500 pounds, so obviously I got in.  I am expecting one for my 30th birthday party.

Wednesday, February 27, 2013

Disney Brave Cake


I made this cake my my niece who turned four, even though I told her not to!  It took about 7 hours, minus baking time.  The top tier was four layers in 6x2 Wilton pans, and the bottom was 6 layers in 8x2 Wilton pans.  But, I'm getting ahead of myself.  It started with a sketch at like 3 am:


I wanted it to be very tall and skinny.  I wanted it to have a strong presence and really say something kinda like Merida, and definitely like my Katey Bird.  I knew I'd need a sturdy cake to support itself.  I've used this recipe for a moist yellow cake recipe before from Bakerella, but I've found it more dense than moist, and perfect for carving and when you need some weight!  Here she is:


Moist Yellow Cake from Bakerella
Ingredients
  • 1 cup (2 sticks) of butter (room temperature)
  • 2 cups of sugar
  • 4 eggs (room temperature)
  • 3 cups of sifted self-rising flour (White Lily)
  • 1 cup of whole milk (room temperature)
  • 1 teaspoon pure vanilla extract (McCormicks)
  • 1/2 teaspoon butter flavoring

Directions
  • Preheat oven to 350 degrees.
  • Grease and flour (3) 8 inch cake pans.
  • Using a mixer, cream butter until fluffy.
  • Add sugar and continue to cream for about 7 minutes.
  • Add eggs one at a time. Beat well after each egg is added.
  • Add flour and milk (alternating to creamed mixture), beginning and ending with flour.
  • Add vanilla and butter flavoring to mix; until just mixed.
  • Divide batter equally into three cake pans.
  • Hold each layer about 3 inches above your counter and carefully drop the pans flat onto counter several times to ensure release of any air bubbles. This will help you have a more level cake.
  • Bake for 25 – 30 minutes (depending on your oven) until done.
  • Cool in pans for 5 – 10 minutes.
  • Remove and immediately wrap each layer in plastic wrap to seal in moisture. Cool completely on wire racks.
  • Once cooled, you are ready to assemble your cake.
I also got the idea of making the top a bulls-eye with an arrow going through it, and hand painting the cake with forest scenes.  I realized that since it was going to be so tall, it would be difficult to cover in fondant, and require a lot of it.  So, I went searching for the best crusting buttercream I could find.  I found it here at Cake Trimmings:

Best Crusting Buttercream from Cake Trimmings
Ingredients
  • 2 lbs. sifted powdered sugar
  • 1/2 cup softened butter (for whiter frosting, use butter without dyes)
  • 1-1/2 cups shortening
  • 2 tbsp. clear vanilla extract
  • 1/3 cup water for frosting the cake or 1/4 cup for decorating
  • 1/4 tsp clear almond extract or any flavor you like
  • If you live where it is very humid, add 1 or 2 tbsps meringue powder
Directions
  • Mix shortening, butter, and extracts until creamy.
  • Gradually add water
  • SLOWLY add powdered sugar, a little at a time, being careful to not have it poof in your face
  • Mix thoroughly just until smooth and creamy.  Do not mix on high speed or over mix it.
  • Now you’re ready to frost your cake.
So, the day before I spent about 6 hours baking the cakes.  After cooled I stacked them, doweled them, put cardboard circles about every three layers, then put a giant dowel through the entire thing.  Scary.  My husband did it. He was also in charge of making the arrow.  Um, yeah he's pretty awesome.


I always use Wilton Color Mist for my airbrushing!  Let's face it, airbrushing machines are expensive and seriously, these do the job wonderfully.  They're like little cans of spray paint that you can find in the cake section of your local grocer.  They are amaze.  Duff Goldman has a similar product called Cake Graffiti that offers metallics as well.


I used thinned frosting to paint with and added the ever-so-enticing chocolate rock candy by just shoving them meticulously and artfully in there.  This cake was a lot of work, but it's one of my very favorites.  

*more figurines were added and re distributed.