Showing posts with label buttercream. Show all posts

Thursday, September 12, 2013

So Long Sweet Summer

Just a few ideas to send you off on your way to Fall and say farewell to Summer!  I created this easy peasy hamburger cupcake for Spencer's work BBQ.  Use brownies for the patties and a petal tip for your salad.  Magnifico!

My sister-in-law was throwing a luau baby shower for her equally pregnant BFF.  This is my alternative to my standard pregnant belly cake.  Isn't it cute?  It was a nice departure.  Get it?  Departure?  Never mind.


My mom and I threw Jess her own baby shower...and it was pretty epic.  That deserves it's own post though!  So long, sweet Summer!  It's been...hot.

Brace yourself for the Fall, you guys.  I go slightly cray cray in the baking department.  Get ready.  

Wednesday, July 10, 2013

Father's Day Shirt and Tie Cake


I'm a Daddy's girl, and I'm not afraid to admit it.  Over the recent years, as I've moved closer to my dad's office, he comes over a few times during the week to check on me.  I look forward to our little chats and frequent chances to get those bear hugs that only dads can give.

I admire so many qualities about my dad.  One of his most admirable qualities is his totally selfless nature.  My dad doesn't have a selfish bone in his whole 6-foot-tall body.  He taught me by example to love others and pay attention to ways you might be able to serve them.  Serving others always made Dad happy, and in turn made us excited and happy to be doing so as well.  He was always the first one to volunteer when called upon, but Dad doesn't need direction.  It was never odd for him to come home after a long day at work and change into his "grubbies" and say, "I saw that Mrs. So-and-so was pulling weeds.  I think I'll go help her."  He never seeks recognition either.

Dad is a commercial real estate agent so he can schedule his own hours.  He uses this to not his advantage, but others'.  Dad is always chauffeuring me around and getting me to where I need to be, be it a job interview, a meeting, or the grocery store.  If he's not driving me around, he's taking his alzheimer-ridden mother for a drive to spend some quality time with her and jog her memory.  My other Grandma and Grandpa rely on my dad to help them with their business affairs and know he'll never let them down.  My favorite story, though, is when my boyfriend moved halfway across the country to live with his dad, my daddy decided to fly him back to Utah for my sixteenth birthday so that he could take me on my first date, to the prom.  My mom and I found the perfect prom dress, but it was $600; way out of budget.  I chose another dress, but the next day when I got home, the dream dress was laying on my bed.  I later found that my dad had sold his gun safe and all of the guns inside; just so I could have my dress.

Speaking of fashion, my dad is always clean cut and looks fresh and as nice as can be.  He wears a dress shirt and tie every day and looks so handsome.  I was inspired by Justin Timberlake ;) and decided to make him a cake for Father's Day that represented that aspect.


Of course, I marked it "Priceless," just like my dad.  The tie was the most fun.  I used an edible marker and then painted the whole thing with luster dust after running a very slightly damp towel over it.  Enjoy!  And give your dads a hug.

Tuesday, June 18, 2013

Star Wars Party

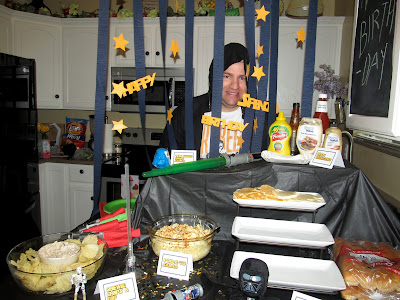
Sooo...much to my dismay, my husband is obsessed with Star Wars.  Like, ob. sessed.  I had no idea until about two years into our marriage.  About two years too late.  ;)  This year I decided to throw him a little Star Wars shindig for his birthday.  It turned out super cute, so I thought I'd share!


We had  a start of summer BBQ with Han Burgers, Pod-a-to Salad, Chewie Chips and Dip, and a rad Death Star watermelon my friend carved.


For Dessert we had Leia Buns, Wookie Cookies, Tatooine Trail Mix, and of course, cake!


 I got a lot of ideas on Pinterest (duh) and I made light saber napkin holders (which were my fave) and pool noodle light sabers for the kiddos!  (Don't I have the cutest nieces and nephews ever?!)


 I was planning on light sabers out of large pretzel rods dipped in chocolate, but my mom bought me little pretzels instead.  Have I mentioned how I hate not being allowed to drive?  Ugh, epilepsy!  So, not wanting her to fret, I decided to make a trail mix with the little guys.  I melted some candy melts and dipped them.


Then, I added some whoppers for thermal detonators!  Next, I wanted to add something super scary...Darth Vader heads.  Around Easter I found some Darth Vader easter eggs at Target.  (I'm sure you could find them on Amazon.)  


I sprayed them liberally with cooking spray, then filled them with my candy melts.  This little deviled egg transporter was great for holding them in place while I filled them.  Sidenote:  I make stellar deviled eggs.  It's a secret recipe, though.  ;)


It was REALLY messy.  Be warned.  They were a little difficult to get out, so I used my hairdryer to melt them a little, then used a meat mallet to pound them till they came out.  They looked a little scary when I finally got them out, but he's scary, right?


Finito!!


 Now, let's talk cake.  This was one of my fave cakes.  Hubs said it was my best yet!  Isn't he cute?  It was actually a lot easier than I thought it would be. I didn't dowel him so by morning,  he collapsed on himself a little.  Next time I'll dowel his body and add a board under his second layer and his head. I used four six inch cakes stacked on themselves and one half of a Wilton ball pan for his bod.  His head is covered in gray fondant sprayed with Wilton color spray and his body is buttercream with fondant accents.


 For his arms I got a little tricky.  I was going to use rice krispie treats but I didn't have any on hand.  I used four cupcakes dissected; two regular cupcakes and two jumbo ones.  Now, to explain this, I had to utilize my technical writing degree in all it's glory.  Click here for instructions on how to assemble R2D2's arms.


Be sure to leave a comment and a link to your R2 cake!  Happy birthday, Honey!


Wednesday, June 5, 2013

Tianna Cupcakes: a Tutorial and Free Printable

My niece turned 7 this last month and requested a Tiana, or Princess and the Frog birthday.  I wanted to do something different than this cake that I've done:


So I started perusing, and came across this bad boy on Cake Central by KO_sbaker!


YES!!  Then, sadly, I had to check myself before I wrecked myself, and remind myself that she's SEVEN and save this one for her 16th birthday.  So, I went with these instead:


They were super easy.  You can make them too!  See the cute invite in the back?  My sister bought it from T3designs.com and I used it so everything would match.  It's illegal for me to let you do that too, since you didn't buy it.  Don't be sad!  I made this one for you!  Just click to download my free printable!  https://www.dropbox.com/sh/k6d6agz2fu2cmvj/fwb27sDkAi/tiana%20cupcake%20toppers.pdf

I'd love to make you an invitation too!  Just e-mail me at chelsi.johnston@gmail.com

Okay, so, after you print those out on white cardstock, cut them out while you watch The Princess and the Frog.  After that's done, bake some cupcakes in pretty liners.  I got my flower liners at Micheal's.  After I baked them I got the idea to plop a Hershey's kiss in the middle of each cupcake before baking.  You know, because she had to kiss the frog?  Anyway...

Let's talk icing.  A good ratio is 2 cups shortening or butter for every pound of powdered sugar you use.  If you use shortening, your frosting will have a truer color and it will be fluffier.  However, it will be a little greasier than butter.  A pinch of salt can help cut the greasy factor.  Butter is great too and tastes like a true buttercream, but it will color your frosting yellow.  And lets face it, sometimes you don't have 4 sticks on hand!  I typically use half shortening and half butter in my frosting, unless I'm worried about color. Let's get to the good stuff.

Basic Vanilla Buttercream:
yield about 4 cups, enough for 24 cupcakes
2 cups (4 sticks) butter or shortening, or both
1 tsp vanilla (Use clear vanilla to avoid coloring your frosting yellow.)
pinch of salt
1 lb (about 3 and 3/4 c) confectioner's (powdered) sugar, sifted

  1. Cream butter/shortening, vanilla and salt in a mixer till fluffy and smooth
  2. Place a towel around your bowl to avoid a sugary cloud
  3. At your mixer's lowest speed, add powdered sugar 1/4 c at a time, turning up the speed as needed.  
Voila!  East peasy, right?  Now, about adding color.  If you can, use gel colors instead of liquid.  Gel colors have less of a thinning effect on your icing.  They are available in the baking section of grocery stores and hobby stores.  Betty Crocker is even making them now so they are easily available!  Add your color a little bit at a time using a toothpick.  Remember, you can always add but you can't take it back!  Dye all of your icing yellow for now.

Now, lets fill our bags.  If you are looking for icing tips, I used a large standard leaf tip, #366 for the yellow petals, and a small standard leaf tip, #352 for the leaves on her skirt.  If you don't own icing tips, you can cut the corner of a ziplock bag into a V, just like this tip:
Cut small, you can add later if you need to.  Also, if you're using this method, reinforce the sides of your bag with tape.  

Decorating Tiana Cupcake:
  1. Fill your bag with yellow icing; we're using the large tip first.  I find it makes it easier to put my bag into a tall glass and fold the edges over; like this:
  2. Now grab a cupcake.  Hold your tip in the middle of the cupcake with the tip turned like a beak, so the points are vertical from your point of view.  
  3. Squeeze the bag and build up the base of the leaf.  Pull out from the center, decreasing pressure as you go.  Drag out to the edge of the cupcake and release all pressure, forming a point.  Don't worry.  If it's ugly, just scrape it off and put it back in your bowl.  Form six petals that meet in the middle on each cupcake.
  4. Stick Tiana in the middle
  5. Squeeze remaining icing into your mixing bowl and add blue to create green.  
  6. Switch to the smaller tip, or cut a smaller V in a ziplock bag and fill.
  7. Use the same method to make smaller, shorter leaves on top of the yellow petals and around the base of Tiana.
  8. I used fondant and this tiny cutter tool to create the lily at the base of her skirt.  You could easily use cookie cutters if you had them, or cut them by hand.  A flower-shaped sprinkle would be cute too!
  9. Finally, I sprinkled gold-colored sugar over it to make it sparkle!
I hope you can use this tutorial to make your own Tiana cupcakes!  Don't forget to comment and leave me a picture!

Friday, April 12, 2013

Oscar Cake


You know what cheers up grouchy people?  Cake.  My nephew was having a Sesame Street birthday party for his second birthday and I'll admit, I kinda lamented.  About two years ago I tried these Sesame Street cake pops from Bakerella.  They were a disaster.  They did not meet my expectations and they took like a bajillion years to make.  UUUUUGH...I get grouchy just thinking about it.  So those were a definite no.  Elmo is adorable, but let's face it, he's played.  My favorite character is Cookie Monster, duh, but I couldn't really think of a way to translate him into cake (not yet anyway).  So, when the hubs suggested Oscar, I went for it.  Garbage can=cake shaped=score!  So, I was searching for Oscar images and ran across this tutorial on YouTube.  He suggested using muffin tops for Oscar's head. Brill.  So, that's what I did.

I used five layers of a six-inch chocolate cake for the garbage can.  I was going to use six, but as I stacked them, it started to look too cylindrical.  I stacked three layers, doweled them, and then put the other two layers on a six-inch cake board before stacking them too.  The cake board made a slight rim in the fondant when it was covered, but it looked like the rim of the garbage can; a happy accident.  After covering the cake with A LOT of frosting, I used Duncan Hines Frosting Creations again, cotton candy, kids (and me...) LOVE that stuff, I covered it in white fondant; Duff Goldman's, of course.  It was difficult to cover because it was so tall and we needed a bigger skirt than we were able to get with the amount of fondant we had.  Next time I might consider buttercream in lieu of fondant.

After it was covered, I made details like imprints down the sides using my fondant tools.   I also added a rim using fondant on the bottom and top of the can.  Finally, I made handles (with screws in them; not real ones, duh) and set them out to dry overnight.

For the lid, I baked a giant cookie in my six-inch pan using about half a roll of Nestle chocolate chip cookie dough and ate about a fourth of the rest.  ;)  After letting it harden up a bit, I frosted it and covered it in fondant and added details like imprints and a handle on top. I also made Oscar's eyes and tongue out of fondant the night before so they would harden up a bit too, as well as the number 2 and Slimy!  Slimy is striped, so I rolled out two ropes, one of orange and one of yellow, and cut each into sections.  Then I made a worm using every other color, smushed it together and rolled it a little between my hands to smooth it out.  Thanks Playdough for teaching me these skills in my youth!  If any of you are scared of fondant- it really is like Playdough, but tastes good (if you use Duff Goldman's-- trust me!). I used my Americolor Gourmet Writers to add Slimey's face as well as Oscar's pupils.  Americolor Gourmet Writers are simply markers that have edible ink!  I had just black, red and green ones, but the hubs got me a whole set for Christmas!  Squeal!

Next, I sprayed the entire thing using Wilton Color Mist in black first, a light layer, then in a much heavier layer of silver.  I was really happy with the results.  I frequently get asked if I have an airbrush machine.  Wilton Color Mist is rad.  I don't think I would buy one if I got the chance because I get such good results with the mist!  I would totes buy a Cricut Cake though.  But I digress.  I had to use two whole cans of each color for the garbage can and a whole can of each for the lid and handles.  I actually ran out before the lid and handles and my mom was nice enough to go to the store for me when she came to visit.  I only had four hours to finish the cake and hadn't started Oscar yet.

Then, I dyed the frosting green using about half of a bottle of Wilton Gel Color in green and about a fourth of a bottle in brown to get his grimy color.  I cut two tops off of jumbo chocolate muffins and used the two bottoms for the neck, shoving another dowel through the whole thing.  I frosted the neck and used my spatula, lifting it off of the surface, to create little peaks for the fur.  Then I added the bottom half of his jaw and frosted it using the same technique.  Before I added the top of his head I rolled out a circle of black fondant for the inside of his mouth and pressed it to the bottom half of the jaw till the pressure formed a lip around it.  Then I added his tongue and painted some hilights on it.  I did the same thing with a black fondant circle for the top half of his head after frosting it underneath.  I added the top half of the head, securing it with yet another dowel.  I frosted him and added his eyes with toothpicks, then added his eyebrows and hands using a star tip, then making it messier with my spatula.   Finally, I added Slimey and the handles to the garbage can, securing them with toothpicks.  I waited till we were at the party to lean the lid up in front of the garbage can.  (Ps.  Traveling with him was a little nerve-wracking, despite all of the dowels.  Why do I keep making these tall cakes?!)

I was very happy with the result and so was my nephew!

Tuesday, March 5, 2013

Princess Castle 2.0

Okay, so my girl Liv was turning 5 and having a huuge party.  Like epic.  Like bouncy house epic.  So, in lieu of this standard princess castle cake:


 I decided to kick it up a notch!  Here is the final product:


It was huge!  She loved it! I want to talk about a few things concerning this cake. Let's talk frosting!  This is a fondant covered cake.  I know, I can hear a collective groan.  Stop groaning.  This is a fondant  created by Duff Goldman of Charm City Cakes.  And it is awesome.  It tastes really, really good and it has a soft texture like a marshmallow.  Like MARSHMALLOW fondant.  It tastes like buttercream frosting.  Trust me!  Just try it.  And it is so much easier to use!  It stretches, it's pliable, it's not sticky, and it covers cakes so much easier.  SO much easier than the stuff that I won't mention by name.  I usually by Duff's at Micheal's with a 40% off coupon. I recently saw the fondant at Walmart, but with the coupon it's actually cheaper at Micheal's.  But how convenient to be at Walmart!

I also textured the fondant using another one of Duff's products.  He has these cool texture tiles you can use on your fondant.  I have a stone set, which comes with two sizes of stone, and a wood set, which also comes with two sizes.


Here's an example where I used my wooden set on a Smurf House cake I made:


Now, let's talk about what's underneath the fondant.   Okay, so, this may be the most exciting thing that has happened to me in a long time.  I was perusing the cake aisle at the grocery store and found icing mix ins called Flavor Creations from Duncan Hines.  At first I was like, "Oh, cool."  That was before I saw the flavors. Flavors like:
  • Caramel
  • Key Lime Pie
  • Lemon
  • Lemonade
  • Fruit Punch
  • Bubble Gum
  • Cherry Vanilla
  • Chocolate Almond
  • Chocolate Marshmallow
  • Cinnamon Roll
  • Cotton Candy
  • Chocolate Mint
  • Mocha
  • Orange Cream
  • Strawberry Shortcake
  • White Chocolate Raspberry
  • Peaches n’ Cream
Of course, I had to try one of them.  I knew Liv and her friends would love either bubble gum or cotton candy.  I opted for cotton candy and just added it to my icing recipe.  It turned the most beautiful shade of blue and it. was. so. GOOD!  I wanted to take out a cup and just eat the frosting.  I cannot wait to try the rest of them!  I saw that during the holidays they have flavors like eggnog and gingerbread too!  Oh, yes!  

Ps.  Bouncy houses can hold up to like 500 pounds, so obviously I got in.  I am expecting one for my 30th birthday party.