Tuesday, June 18, 2013

Star Wars Party

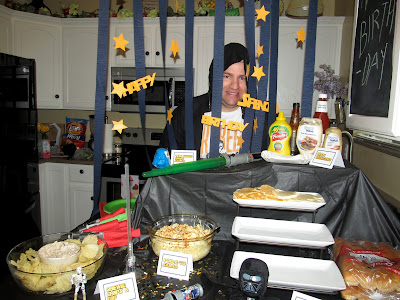
Sooo...much to my dismay, my husband is obsessed with Star Wars.  Like, ob. sessed.  I had no idea until about two years into our marriage.  About two years too late.  ;)  This year I decided to throw him a little Star Wars shindig for his birthday.  It turned out super cute, so I thought I'd share!


We had  a start of summer BBQ with Han Burgers, Pod-a-to Salad, Chewie Chips and Dip, and a rad Death Star watermelon my friend carved.


For Dessert we had Leia Buns, Wookie Cookies, Tatooine Trail Mix, and of course, cake!


 I got a lot of ideas on Pinterest (duh) and I made light saber napkin holders (which were my fave) and pool noodle light sabers for the kiddos!  (Don't I have the cutest nieces and nephews ever?!)


 I was planning on light sabers out of large pretzel rods dipped in chocolate, but my mom bought me little pretzels instead.  Have I mentioned how I hate not being allowed to drive?  Ugh, epilepsy!  So, not wanting her to fret, I decided to make a trail mix with the little guys.  I melted some candy melts and dipped them.


Then, I added some whoppers for thermal detonators!  Next, I wanted to add something super scary...Darth Vader heads.  Around Easter I found some Darth Vader easter eggs at Target.  (I'm sure you could find them on Amazon.)  


I sprayed them liberally with cooking spray, then filled them with my candy melts.  This little deviled egg transporter was great for holding them in place while I filled them.  Sidenote:  I make stellar deviled eggs.  It's a secret recipe, though.  ;)


It was REALLY messy.  Be warned.  They were a little difficult to get out, so I used my hairdryer to melt them a little, then used a meat mallet to pound them till they came out.  They looked a little scary when I finally got them out, but he's scary, right?


Finito!!


 Now, let's talk cake.  This was one of my fave cakes.  Hubs said it was my best yet!  Isn't he cute?  It was actually a lot easier than I thought it would be. I didn't dowel him so by morning,  he collapsed on himself a little.  Next time I'll dowel his body and add a board under his second layer and his head. I used four six inch cakes stacked on themselves and one half of a Wilton ball pan for his bod.  His head is covered in gray fondant sprayed with Wilton color spray and his body is buttercream with fondant accents.


 For his arms I got a little tricky.  I was going to use rice krispie treats but I didn't have any on hand.  I used four cupcakes dissected; two regular cupcakes and two jumbo ones.  Now, to explain this, I had to utilize my technical writing degree in all it's glory.  Click here for instructions on how to assemble R2D2's arms.


Be sure to leave a comment and a link to your R2 cake!  Happy birthday, Honey!


Wednesday, June 5, 2013

Tianna Cupcakes: a Tutorial and Free Printable

My niece turned 7 this last month and requested a Tiana, or Princess and the Frog birthday.  I wanted to do something different than this cake that I've done:


So I started perusing, and came across this bad boy on Cake Central by KO_sbaker!


YES!!  Then, sadly, I had to check myself before I wrecked myself, and remind myself that she's SEVEN and save this one for her 16th birthday.  So, I went with these instead:


They were super easy.  You can make them too!  See the cute invite in the back?  My sister bought it from T3designs.com and I used it so everything would match.  It's illegal for me to let you do that too, since you didn't buy it.  Don't be sad!  I made this one for you!  Just click to download my free printable!  https://www.dropbox.com/sh/k6d6agz2fu2cmvj/fwb27sDkAi/tiana%20cupcake%20toppers.pdf

I'd love to make you an invitation too!  Just e-mail me at chelsi.johnston@gmail.com

Okay, so, after you print those out on white cardstock, cut them out while you watch The Princess and the Frog.  After that's done, bake some cupcakes in pretty liners.  I got my flower liners at Micheal's.  After I baked them I got the idea to plop a Hershey's kiss in the middle of each cupcake before baking.  You know, because she had to kiss the frog?  Anyway...

Let's talk icing.  A good ratio is 2 cups shortening or butter for every pound of powdered sugar you use.  If you use shortening, your frosting will have a truer color and it will be fluffier.  However, it will be a little greasier than butter.  A pinch of salt can help cut the greasy factor.  Butter is great too and tastes like a true buttercream, but it will color your frosting yellow.  And lets face it, sometimes you don't have 4 sticks on hand!  I typically use half shortening and half butter in my frosting, unless I'm worried about color. Let's get to the good stuff.

Basic Vanilla Buttercream:
yield about 4 cups, enough for 24 cupcakes
2 cups (4 sticks) butter or shortening, or both
1 tsp vanilla (Use clear vanilla to avoid coloring your frosting yellow.)
pinch of salt
1 lb (about 3 and 3/4 c) confectioner's (powdered) sugar, sifted

  1. Cream butter/shortening, vanilla and salt in a mixer till fluffy and smooth
  2. Place a towel around your bowl to avoid a sugary cloud
  3. At your mixer's lowest speed, add powdered sugar 1/4 c at a time, turning up the speed as needed.  
Voila!  East peasy, right?  Now, about adding color.  If you can, use gel colors instead of liquid.  Gel colors have less of a thinning effect on your icing.  They are available in the baking section of grocery stores and hobby stores.  Betty Crocker is even making them now so they are easily available!  Add your color a little bit at a time using a toothpick.  Remember, you can always add but you can't take it back!  Dye all of your icing yellow for now.

Now, lets fill our bags.  If you are looking for icing tips, I used a large standard leaf tip, #366 for the yellow petals, and a small standard leaf tip, #352 for the leaves on her skirt.  If you don't own icing tips, you can cut the corner of a ziplock bag into a V, just like this tip:
Cut small, you can add later if you need to.  Also, if you're using this method, reinforce the sides of your bag with tape.  

Decorating Tiana Cupcake:
  1. Fill your bag with yellow icing; we're using the large tip first.  I find it makes it easier to put my bag into a tall glass and fold the edges over; like this:
  2. Now grab a cupcake.  Hold your tip in the middle of the cupcake with the tip turned like a beak, so the points are vertical from your point of view.  
  3. Squeeze the bag and build up the base of the leaf.  Pull out from the center, decreasing pressure as you go.  Drag out to the edge of the cupcake and release all pressure, forming a point.  Don't worry.  If it's ugly, just scrape it off and put it back in your bowl.  Form six petals that meet in the middle on each cupcake.
  4. Stick Tiana in the middle
  5. Squeeze remaining icing into your mixing bowl and add blue to create green.  
  6. Switch to the smaller tip, or cut a smaller V in a ziplock bag and fill.
  7. Use the same method to make smaller, shorter leaves on top of the yellow petals and around the base of Tiana.
  8. I used fondant and this tiny cutter tool to create the lily at the base of her skirt.  You could easily use cookie cutters if you had them, or cut them by hand.  A flower-shaped sprinkle would be cute too!
  9. Finally, I sprinkled gold-colored sugar over it to make it sparkle!
I hope you can use this tutorial to make your own Tiana cupcakes!  Don't forget to comment and leave me a picture!

First Flight Baby Shower


Yesterday, I told my friend that since I got laid off, I've been busier than ever, but I couldn't really pinpoint what I'd been doing.  I'd pictured using this time to read leisurely in my hammock, update my scrapbook, paint a few paintings, and bake...oooohhh there it is...baking.  I've been baking.  And planning parties!  The first one was a baby shower for a best friend of mine.  She just had her first baby and I was more than excited to throw her a shower.  She's a pilot, so I wanted the shower to be airplane-themed.  I may or may not have been planning this thing for about ten months.  (It was a post-labor shower.)  Here are a few pics of how it turned out!


I made a tiny sky above the food table using balloons, crepe paper and one of many styrofoam planes I bought from the dollar store.  I just strung fishing line from my cabinet to my wall, then hung crepe paper and tied balloons to the line for clouds.  Don't forget your Food Court signage!


Downstairs I hung about six tablecloths cut in half outward from my light fixture in the middle of the room using thumb tacks!  Afterward I made tons of little cloud balls and hung them sporadically, as well as planes, throughout the room and added a few balloons to cover the edges of the tablecloths.


My brother had a few pilotish things since he has his private pilot's license. And a mutual friend of D's and I is also a pilot, so she brought like everything she owned for me to use.  Thanks, Cass!  One of the suitcases is from my local thrift store, and one is my great grandmother's!  How fun is that?


I made some "Wishes for Baby" sheets for the guests to fill out.  This was one of my favorite parts of the shower!

Deneal, the guest of honor, is obsessed with Dr. Pepper, so for dinner we had Dr. Pepper pulled pork sammies.  We also had "Carry-on Coleslaw," "Rainbow Fruit Kabobs," "Seats in the Upright Position Salad" and dessert...

Don't forget treat bags so your guests can take some treats home "for their kids." ;)


Turbulence Taffy.  It's skewered so that people can take a taffy stick!  People thought I'd stacked it in the vases!


Mallow Propellers.  First I made the propellers using white chocolate in a squeeze bottle and squirting it onto parchment paper.  Waxed paper works too.  Then just skewer a mallow, dip it in blue candy melts and let dry.  After they set up, fill another squeeze bottle with blue and use a small mount to attach propellers.  Hold each one in place till it's set up.  Use the same process to attach a green M&M!


Cloudy Cake Pops.  I used a squeeze bottle filled with white chocolate that had set up and thickened a bit to make the clouds.  It took a little trial and error to get the right consistency.


And Dr. Pepper Precious Cargo Cupcakes.  These were sooo good!!  I really liked the consistency.  Recipe from BS in the Kitchen here.


I modified these Valentines from Just Something I Made and used them as invitations.  They turned out adorably.  As a favor, I gave little bags of peanuts.  Just like you get on an airplane, except immensely cuter!  We also gave mini hand sanitizers that said, "Thank you for coming and touching Deneal's life, now you can touch her baby."  Those were a hit, but I failed to get a picture.


As a party game, I froze these creepy plastic babies in icecube trays.  Each guest got one icecube and whoever's baby melted first had to yell, "My water broke!" for a prize.  I usually hate games, but I thought the idea was great! 

I felt like the shower was pretty epic and so did everyone else.  The only fail was that I was so busy being host I neglected to get a picture of me and Deneal!  Sigh.  

Throw your own First Flight baby shower.  See my inspiration board here on Pinterest!  For graphic design requests, just e-mail me at chelsi.johnston@gmail.com.  I'd love to help!